What is Privoxy? Privoxy is a non-caching web proxy with advanced filtering capabilities for enhancing privacy, modifying web page data and HTTP headers, controlling access, and removing ads and other obnoxious Internet junk. Privoxy has a flexible configuration and can be customized to suit individual needs and tastes. It has application for both stand-alone systems and multi-user networks.


3) Set Default Domain Group Policy to disallow local-login for the service account and allow Log on as a service.

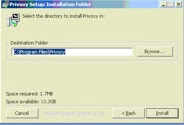
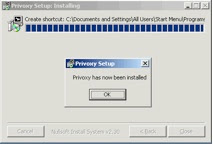
4) Set Privoxy as a service
 A
A5) Configure the Privoxy service to run as the Privoxy user

6) Set the Privoxy service as Automatic and set Recovery to restart the service if fails after one minute.


7) Create three new Organizational Units called “Full Internet Access” “Limited Internet Access” and “No Internet Access” and move the users into their proper organizational units.


In addition, within that group policy set “Disable changing proxy settings” to Enabled:

9) Under the “No Internet Access”, create a Group Policy called “IE Proxy No Internet” and within that policy, uncheck “Use the same proxy for all addresses”, check “Enable proxy settings”, and in the “Address of proxy” set it to IP address 127.0.0.1 for HTTP and Secure. Ensure to also set “Disable changing proxy settings to “Enabled”.

10) Remove the comment on "trustfile"

10) Finally add the following to the Privoxy “Trust List” and you're all done! :)